Gluten-free pie crust makes it easy to bake flaky, golden pies without wheat flour. This simple dough rolls smoothly, bakes up crisp, and works for sweet or savory fillings with just a few pantry staples.
Why You’ll Love This Gluten-Free Pie Crust Recipe
This dough works like a classic pie crust, but it stays gluten-free and reliable.
It rolls out smoothly without cracking when chilled properly.
It delivers flaky layers from the butter + shortening combo.
It bakes up crisp for custards, fruit pies, and no-soggy-bottom quiches.
It freezes well, so you can prep pie days faster.
Notes on Ingredients:
Flour:
For this recipe, use your favorite all-purpose gluten-free flour blend.
Salt:
Salt sharpens flavor and keeps the crust from tasting flat, especially with gluten-free flour blends that can taste starchy. Use fine sea salt or table salt so it disperses evenly in the dry mix.
Sugar:
Sugar adds a subtle sweetness and helps the crust brown more evenly during blind baking. Even for savory pies, this small amount won’t make the crust “sweet,” but it will improve color and flavor balance.
Butter & Shortening:
Butter brings rich flavor, while shortening boosts flakiness and helps the crust hold its shape. Keep both very cold and cut them into small cubes so they stay firm as you work. If the fat starts to soften, chill the bowl for 10 minutes before adding water.
Ice-Cold Water
Cold water prevents the butter and shortening from melting, which protects flaky layers. Add it slowly, 1 tablespoon at a time, and stop as soon as the dough presses together; gluten-free blends vary, so you may not need the full 1/2 cup. Ice water also reduces stickiness, making the dough easier to roll after chilling.
How to Make a Gluten-Free Pie Crust
Whisk the dry ingredients. Add the gluten-free 1:1 flour, salt, and sugar to a large mixing bowl and whisk until fully combined.
Cut the cold fats. Add the cold, cubed butter and cold, cubed shortening, then cut them into the flour using a pastry cutter or fork until the mixture looks like pea-size crumbs.
Add ice water gradually. Drizzle in ice-cold water 1 tablespoon at a time, mixing after each addition, and stop as soon as the dough starts to clump and hold together (you may not need the full amount).
Bring the dough together. Turn the mixture onto a lightly floured surface and gently press it together into a ball, avoiding kneading so the crust stays tender.
Divide and chill. Cut the dough in half, press each half into a flat disc, wrap tightly, and refrigerate for at least 60 minutes so it rolls cleanly and bakes flaky.
Roll into a circle. Lightly flour your work surface (or roll between parchment sheets) and roll one chilled disc into a 12-inch circle, rotating as you go to prevent sticking.
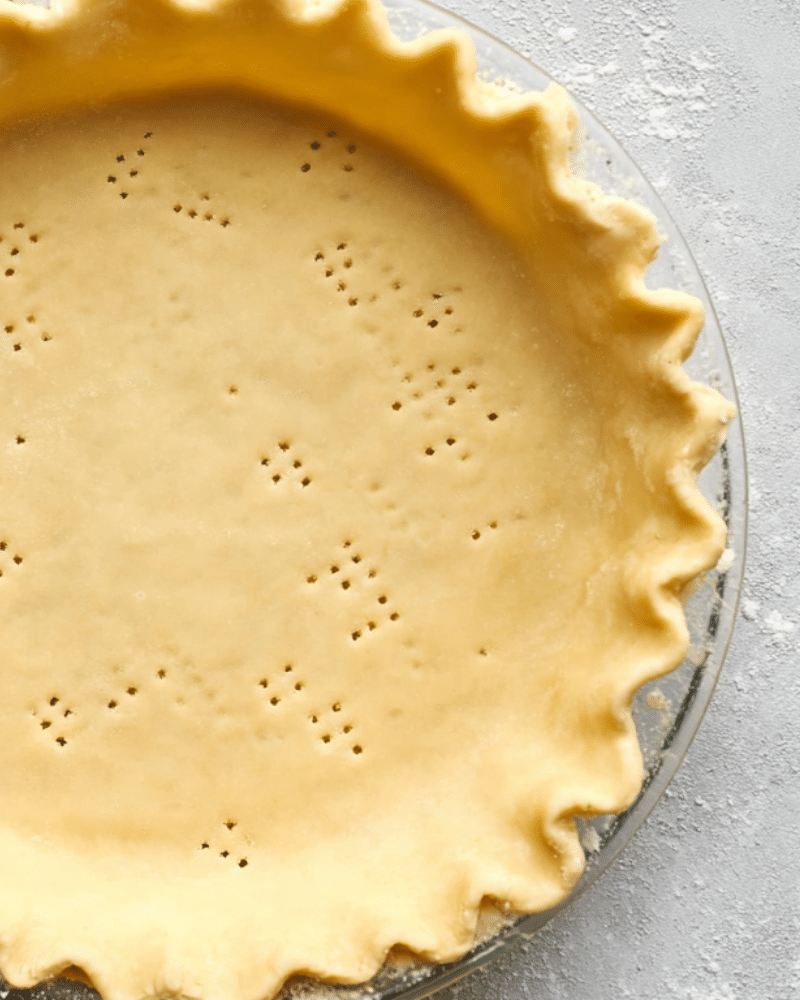
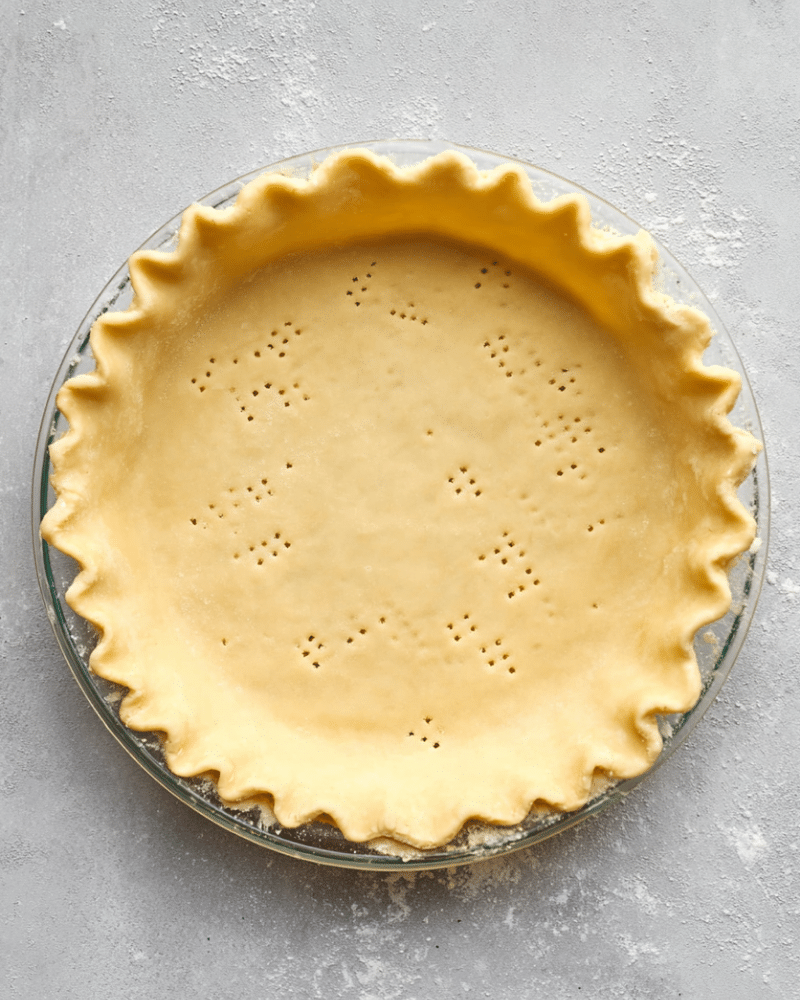
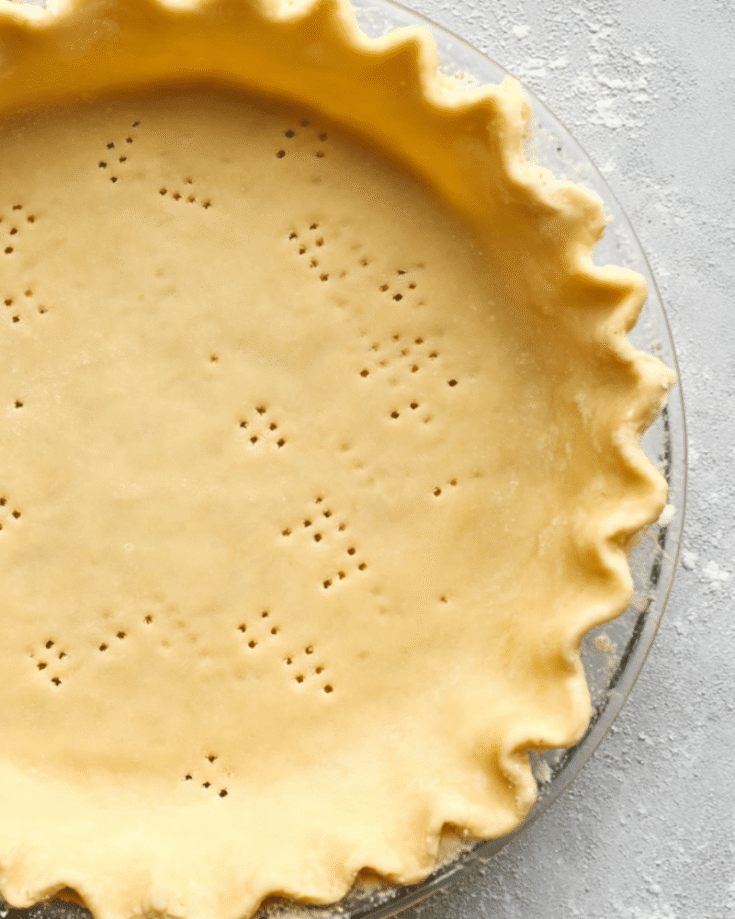
Transfer to the pie dish. Place the dough into a 9-inch pie dish and gently press it into the bottom and sides without stretching.
Trim and shape the edge. Trim excess dough and crimp or decorate the edges as desired.
Blind bake for best results. Line the crust with parchment paper and fill with pie weights (or dried beans/rice). Bake at 400°F for 15 minutes.
Finish baking. Remove the weights, prick the bottom with a fork, then bake 5–10 minutes more for a partially baked crust or 15–20 minutes more for a fully baked crust.
Tips for Success
Small technique tweaks make a big difference in gluten-free baking.
Chill the dough long enough; cold dough rolls cleaner and shrinks less.
Flour your surface and rolling pin, then rotate the dough as you roll to prevent sticking.
Stop adding water as soon as the dough holds together when you press it.
If cracks form, patch them with dough scraps and press gently to seal.
If the crust slumps while baking, chill the shaped crust 10-15 minutes before blind baking.
Make-Ahead and Storage
This crust fits nicely into a busy baking schedule.
You can refrigerate wrapped dough discs for up to 3 days.
Freeze-wrapped discs for up to 3 months; thaw overnight in the fridge before rolling.
Store a fully baked crust at room temperature (covered) for 1 day, or refrigerate 2–3 days for best texture.
Ways to Use This Gluten-Free Pie Crust
This versatile crust works in more than just dessert pies.
- Pumpkin pie, pecan pie, or sweet potato pie
- Apple pie, berry pie, or cherry pie
- Quiche Lorraine or veggie quiche
- Pot pie (use as a bottom crust or top crust)
- Galettes (roll, fill, and fold rustic edges)
Looking for more gluten-free recipes? Be sure to check these recipes out:
- Gluten Free Pizza Crust Recipe
- Fluffy Gluten-Free Buttermilk Pancakes
- Gluten Free Cheddar Bay Biscuits
- Soft Gluten-Free Hamburger Buns
You can also FOLLOW ME on Facebook and Pinterest to see more of the delicious food I’m making!
Gluten-Free Pie Crust Recipe
Make a flaky Gluten-Free Pie Crust that rolls easily and bakes crisp. Simple ingredients, clear steps, and blind-baking tips for perfect pies every time.
Ingredients
- 2 1/2 cups gluten-free 1:1 flour
- 1/2 teaspoon salt
- 3 teaspoons granulated sugar
- 1/2 cup unsalted butter, cold and cubed
- 1/2 cup vegetable shortening, cold and cubed
- 1/2 cup of ice-cold water (use only what you need)
Instructions
- Whisk the dry ingredients. Add the gluten-free 1:1 flour, salt, and sugar to a large mixing bowl and whisk until fully combined.
- Cut the cold fats. Add the cold, cubed butter and cold, cubed shortening, then cut them into the flour using a pastry cutter or fork until the mixture looks like pea-size crumbs.
- Add ice water gradually. Drizzle in ice-cold water 1 tablespoon at a time, mixing after each addition, and stop as soon as the dough starts to clump and hold together (you may not need the full amount).
- Bring the dough together. Turn the mixture onto a lightly floured surface and gently press it together into a ball, avoiding kneading so the crust stays tender.
- Divide and chill. Cut the dough in half, press each half into a flat disc, wrap tightly, and refrigerate for at least 60 minutes so it rolls cleanly and bakes flaky.
- Roll into a circle. Lightly flour your work surface (or roll between parchment sheets) and roll one chilled disc into a 12-inch circle, rotating as you go to prevent sticking.
- Transfer to the pie dish. Place the dough into a 9-inch pie dish and gently press it into the bottom and sides without stretching.
- Trim and shape the edge. Trim excess dough and crimp or decorate the edges as desired.
- Blind bake for best results. Line the crust with parchment paper and fill with pie weights (or dried beans/rice). Bake at 400°F for 15 minutes.
- Finish baking. Remove the weights, prick the bottom with a fork, then bake 5–10 minutes more for a partially baked crust or 15–20 minutes more for a fully baked crust.
Nutrition Information:
Yield:
24Serving Size:
1Amount Per Serving:Calories: 114Total Fat: 10gSaturated Fat: 5gUnsaturated Fat: 5gCholesterol: 14mgSodium: 47mgCarbohydrates: 21gFiber: 1gSugar: 1gProtein: 3g