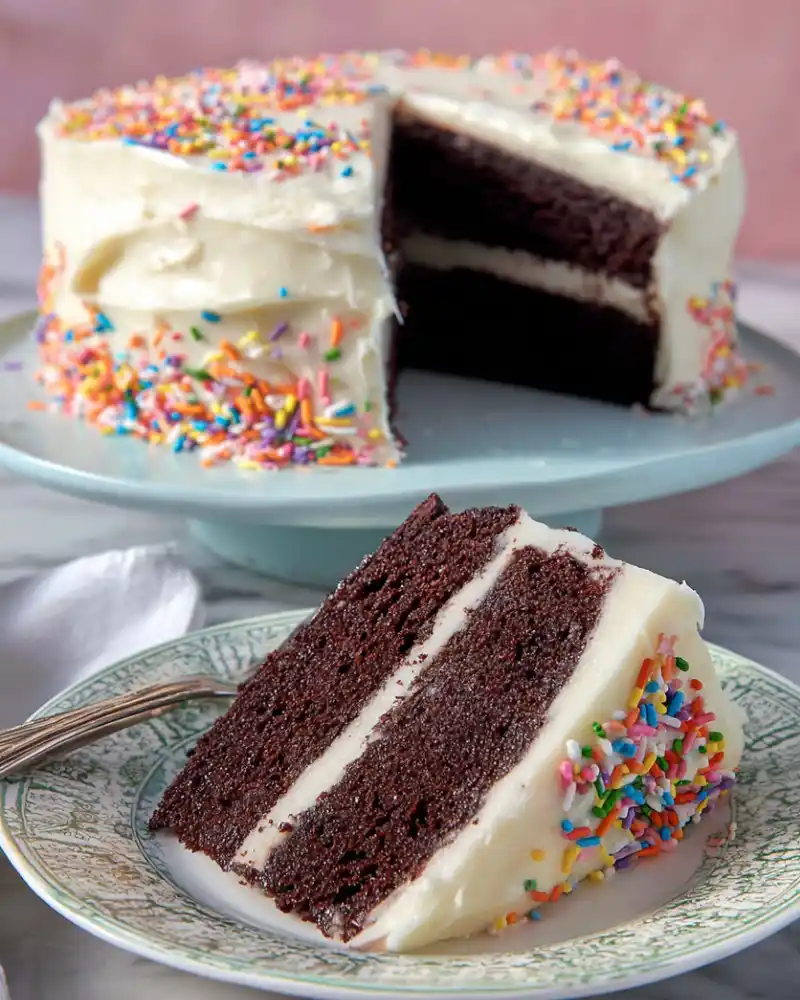
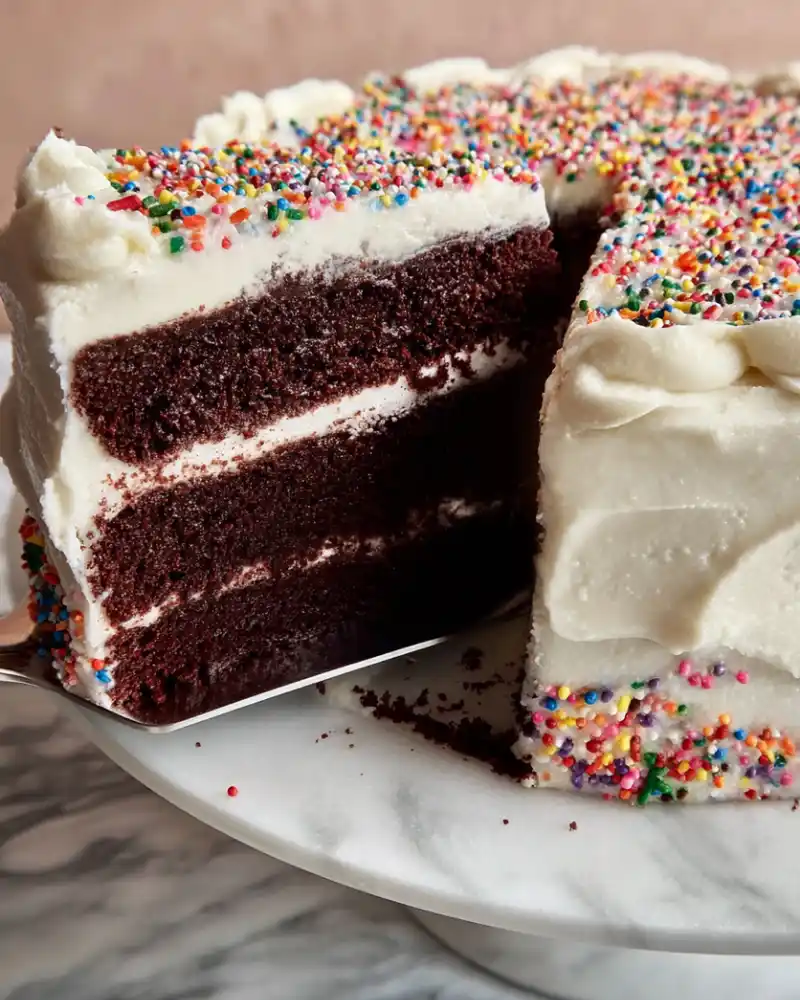
This Gluten-Free Chocolate Cake with Vanilla Frosting delivers rich cocoa flavor, a moist, tender crumb, and a classic sweet finish. This easy, foolproof cake bakes up beautifully for birthdays, holidays, and everyday cravings.
Notes on ingredients for Gluten-Free Chocolate Cake with Vanilla Frosting
Gluten-free flour blend with xanthan gum: You’ll get the best structure and lift from an all-purpose gluten-free flour that already contains xanthan gum (you mentioned GFJules, which is a strong choice). If your blend doesn’t include xanthan gum, the cake can sink or crumble more easily.
Cocoa powder: Hershey’s Cocoa (unsweetened) works perfectly here. Any unsweetened cocoa or cacao powder will work, but some “raw cacao” powders are more bitter, so that the chocolate flavor may taste sharper.
Coffee (hot, strong): Coffee deepens the chocolate flavor without making the cake taste like coffee. Decaf is totally fine. If you don’t want to use coffee, you can swap it with hot water, but you’ll lose a little richness.
Buttermilk: The acidity helps tenderize and activate the baking soda, resulting in a strong rise. Use real buttermilk, or make your own by adding 1 tablespoon of vinegar to milk and letting it sit 5–10 minutes.
Oil vs. butter in the cake: Oil keeps the gluten-free cake moist longer than butter. Canola is neutral; olive oil works too (use a mild one so it doesn’t add a strong flavor).
Room-temperature eggs: They blend more smoothly and help the cake rise more evenly.
Confectioners’ sugar for frosting: Sift if yours is lumpy. It helps make the frosting smoother and easier to spread.
How to make Gluten-Free Chocolate Cake with Vanilla Frosting
1) Prep the pans and oven
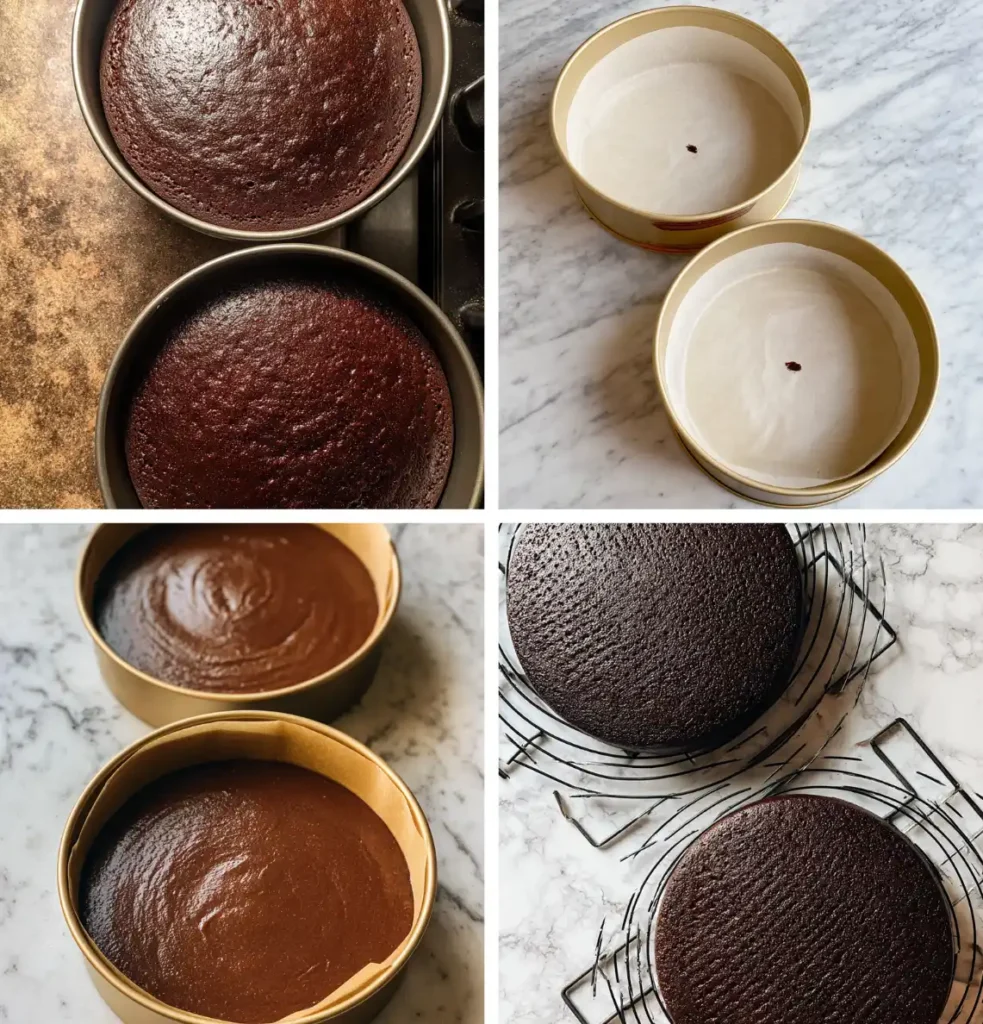
Preheat the oven to 350°F. Grease and flour the pan(s) you’re using with gluten-free flour.
2) Mix the dry ingredients
In a large mixing bowl, whisk (or use a paddle attachment) to combine:
- Sugar
- Gluten-free flour
- Cocoa powder
- Baking powder
- Baking soda
- Salt
Whisking thoroughly helps prevent bitter “pockets” of cocoa or uneven rise from clumps of leavening.
3) Add the wet ingredients and beat
Add the coffee, eggs, buttermilk, oil, and vanilla extract. Beat on medium speed for 2 minutes.
Don’t panic when you see the consistency: the batter will be thin and pourable. That’s exactly right for this style of chocolate cake.
4) Bake
Pour into prepared pan(s).
- For a 9×13-inch pan: bake about 35–40 minutes.
- For two 9-inch rounds: bake about 30–35 minutes, but use the toothpick test as your guide.
It’s done when a toothpick inserted in the center comes out clean (a few moist crumbs are okay; wet batter is not).
5) Cool correctly (this matters for gluten-free cakes)
Let the cake cool in the pan(s) for 45 minutes. Gluten-free cakes are more fragile when hot, and this rest time helps the crumb set.
If you used round pans, turn the cakes out onto a cooling rack, peel off the parchment, then flip right-side up using a second rack. Cool completely before frosting, or your frosting will melt and slide.
Make-ahead option
It’s possible to bake the cake layers ahead of time. Leave the cake on racks (or keep it in the 9×13 pan) and loosely cover with wax paper. Add a toothpick or two as “tent poles” so the wax paper doesn’t stick to the cake’s surface.
Vanilla frosting (creamy, classic, easy)
This frosting is simple and sweet, the perfect pairing for a bold chocolate cake.
1) Beat the butter
In a small mixing bowl, beat softened butter (or dairy-free butter).
Softened means it dents easily when pressed, but isn’t shiny or melted. If it’s too cold, the frosting can get lumpy; too warm, and it can get loose.
2) Add remaining ingredients
Add the confectioners’ sugar, vanilla, and milk. Mix until combined and creamy.
If the frosting feels too thick to spread, add milk 1 teaspoon at a time. If it feels too soft, add a bit more confectioners’ sugar.
How to frost the cake (layer cake method + pro tips)
If you’re building a layer cake, place one cake layer on your serving plate and frost the top.
To keep crumbs from “grabbing” as you spread, use a generous scoop of frosting and spread gently; pressing too hard can pull at the cake surface. A butter knife works surprisingly well for the sides because it gives you control and doesn’t dig in as sharply as some offset spatulas.
Add the second layer, frost the top, then frost the sides. Finish with extra swirls on top. Clean the plate edge with a damp paper towel for a polished look, then add sprinkles if you want.
Storage
Store the frosted cake in the refrigerator, loosely covered with wax paper, for up to 5 days. For the best texture, let slices sit at room temperature for about 15–20 minutes before serving so the crumb softens and the frosting becomes creamy again.
Looking for more gluten-free dessert recipes? Be sure to check these recipes out:
- Gluten Free Lemon Cake with Lemon Cream Cheese Frosting
- Gluten-Free Black Forest Gateau – Rich, Chocolatey & Delicious
- Gluten Free Cinnamon Pull-Apart Bread
- Gluten Free Funfetti Mug Cake
You can also FOLLOW ME on Facebook and Pinterest to see more of the delicious food I’m making!
Gluten-Free Chocolate Cake with Vanilla Frosting

Bake Gluten-Free Chocolate Cake with Vanilla Frosting—deep chocolate flavor, tender crumb, and creamy vanilla icing. Perfect for birthdays and holidays.
Ingredients
Pan size:
- Recipe makes a 9x13x2 inch cake pan OR 2 9 inch round cake pans for a layer cake as I did here
Cake:
- 2 cups granulated sugar
- 1 ¾ all-purpose gluten-free flour with xanthan gum we use GFJules
- ¾ cup Hershey’s Cocoa (100% cacao unsweetened) or unsweetened cacao powder of choice
- 1 teaspoon baking powder
- 2 teaspoons baking soda
- 1 teaspoon salt
- 2 large eggs, room temperature
- 1 cup strong black coffee (decaf great too!)
- To make buttermilk, add 1 tablespoon of white vinegar to a liquid measuring cup and add milk of choice to equal 1 cup. Let sit for 5-10 minutes.
- ½ cup oil of choice (we've used canola and olive oil)
- 1 teaspoon vanilla extract
Vanilla Frosting:
- 1 1 lb box confectioner sugar (about 3 3/4 cups)
- 2 teaspoons vanilla extract
- 4 tablespoons butter or dairy-free butter, softened
- 4 1/2 tablespoons milk of choice
Instructions
Chocolate Cake
- Preheat your oven to 350°F.
- Lightly grease and flour your chosen baking pan(s). If you're using two 9-inch round pans, line the bottoms with parchment circles and coat them as well. This helps the cakes release cleanly once baked. Set aside.
- In a large bowl, whisk together the sugar, flour, cocoa powder, baking powder, baking soda, and salt until everything is well combined.
- Add the eggs, brewed coffee, buttermilk, oil, and vanilla extract. Mix on medium speed for 2 minutes. The batter will be quite thin, so there's no need to worry.
- Divide or pour the batter into the prepared pan(s). Bake for 35 to 40 minutes.
- When the cakes are done, let them cool in their pans for roughly 45 minutes. If using round pans, carefully invert the cakes onto a rack, peel off the parchment, then flip them upright onto a second rack.
- Allow to cool completely before adding frosting.
- Make-ahead option: You can bake the cake the day before. Leave it on cooling racks (or in a 9×13 pan), loosely covered with wax paper. Use a toothpick or two to keep the wax paper lifted so it doesn’t stick to the cake.
Vanilla Frosting
- In a small bowl, beat the butter until smooth.
- Add the remaining ingredients and mix until you have a soft, creamy frosting.
Frosting the Cake
- Position the first cake layer in the center of your serving plate and spread a generous layer of frosting over the top.
- Pro tip: To keep the frosting from tearing the cake, scoop big spoonfuls of frosting onto the surface first. Then use an offset spatula or a simple butter knife to gently smooth it out. Add more spoonfuls as needed until the top is fully covered.
- Place the second cake layer on top and frost the top surface.
- Frost the sides of the cake, then add any finishing swirls or texture you like. Wipe the rim of the serving plate with a damp paper towel to keep things tidy. Decorate with sprinkles if you want a pop of color.
- Store the finished cake in the refrigerator for up to 5 days, covered loosely with wax paper.
Recommended Products
As an Amazon Associate and member of other affiliate programs, I earn from qualifying purchases.


Does this mean there is 1 cup of buttermilk in recipe?