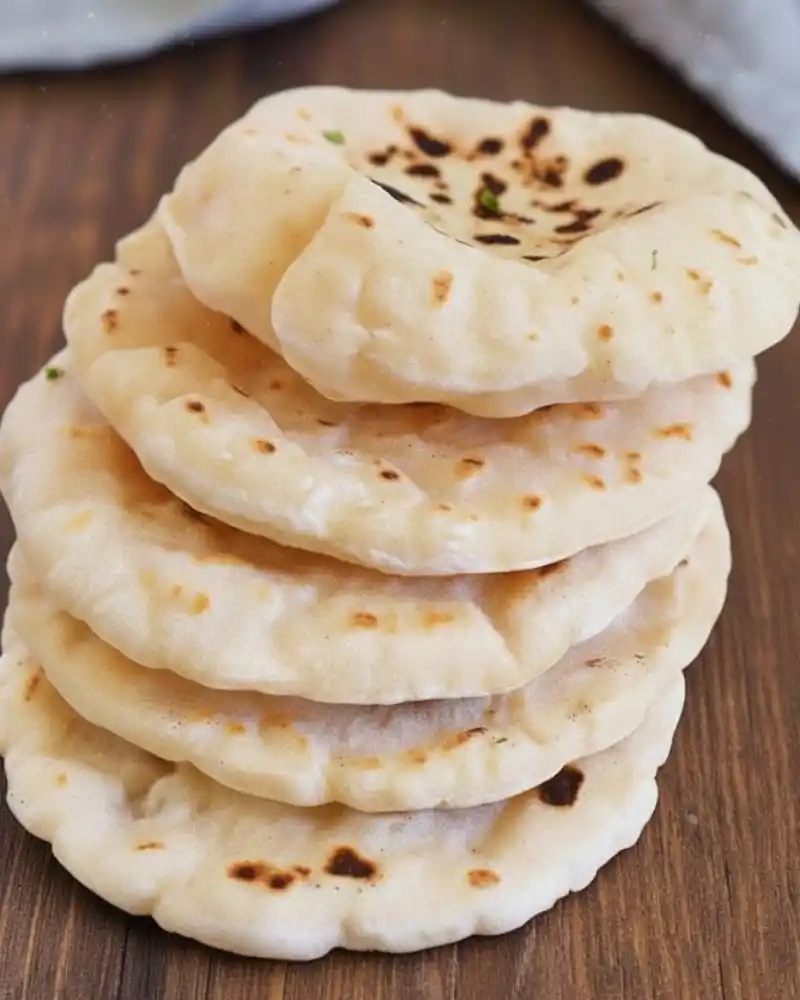
This Gluten-Free Pita Bread delivers warm, soft pockets you can stuff with anything without wheat. This stovetop recipe uses rice flour, tapioca, and psyllium for lift, chew, and puffs at home.
Gluten-Free Pita Bread became a “must-have” recipe after too many lunches ended with lettuce wraps that tore and store-bought gluten-free flatbreads that cracked the second they were filled.
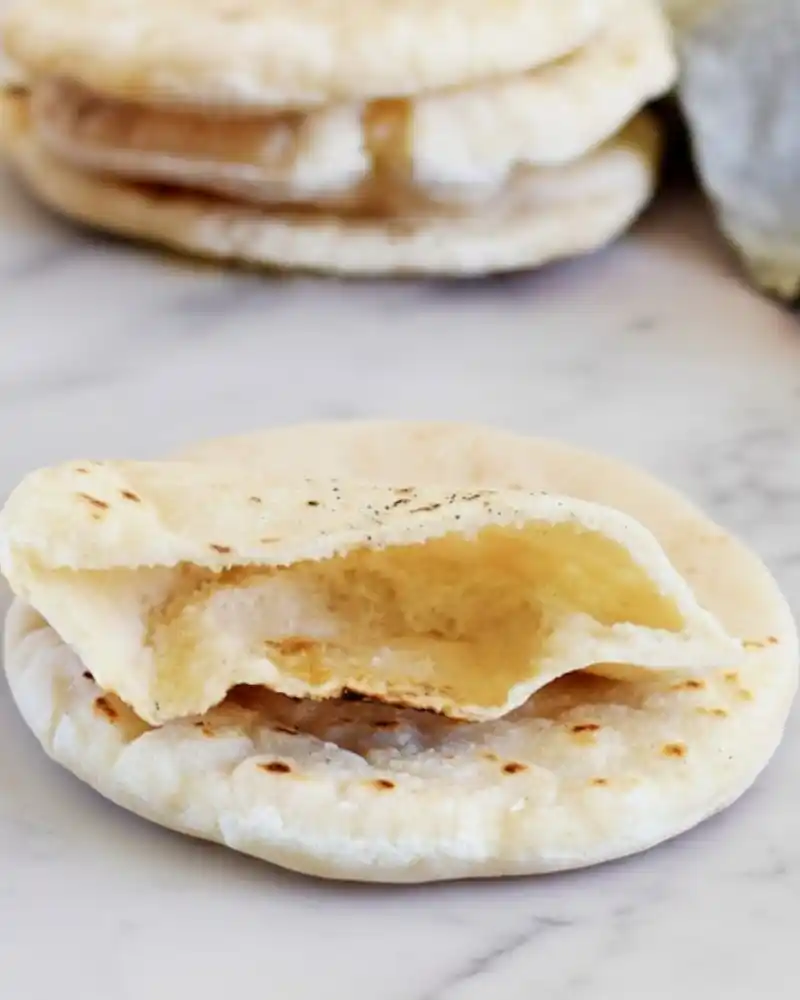
One weeknight, the goal shifted to one simple win: a soft pita that actually puffs and opens into a pocket on a skillet, so it can hold falafel, chicken, or a quick hummus-and-veggies lunch without falling apart. This version leans on rice flour, tapioca flour, and psyllium husk powder to create structure and flexibility, while the heat turns trapped steam into that classic pocket.
After the first successful puff, this recipe earned a permanent spot in the meal-prep routine: cook a batch, keep them covered so they stay tender, and rewarm one in a hot pan whenever a fast sandwich craving hits.
Notes on ingredients
Warm water: Aim for 40 °C (104 °F), warm to the touch, not hot, so you don’t weaken the yeast.
Yeast: 20 g fresh yeast equals about 7 g active dry yeast or instant yeast (roughly 2 1/4 tsp). If the mixture turns frothy after 5 minutes, your yeast is active.
White rice flour: Use finely milled white rice flour for a smoother dough and better puff. (You can swap in regular flour only if you’re not gluten-free.)
Tapioca flour/starch: It adds stretch and helps create that classic pita chew.
Psyllium husk powder: This acts like the “gluten” in the recipe by trapping gas and helping the pita form a pocket.
Oil + sugar: Oil improves softness; sugar feeds the yeast and supports browning.
How To Make Gluten-Free Pita Bread
Prepare the Yeast
For best accuracy, I suggest weighing your ingredients in grams using a kitchen scale rather than measuring by volume.
Warm the water gently in a small saucepan over medium heat until it’s just lukewarm, not hot, around 40°C (104°F).
Stir in the yeast and sugar, then set the mixture aside for about 5 minutes. When a light foam appears on the surface, the yeast is activated and ready to use.
Mix the Dough
In a large bowl, whisk together the rice flour, tapioca flour, psyllium husk powder, and salt until evenly combined.
Pour in the yeast mixture along with the oil, and mix using a wooden spoon until a soft dough forms.
Knead and Rise
Work the dough with your hands for a few minutes until smooth, then shape it into a ball and return it to the bowl.
Cover tightly with cling film and place in a warm spot (ideally 40–50°C / 104–120°F). Let it rise for 45–60 minutes, or until visibly puffy.
Shape the Pitas
Divide the dough into 10 equal portions, about 90 grams each, and roll them into balls.
Cover and allow them to rest for 10–15 minutes.
Using a lightly floured rolling pin, roll each ball into a round approximately ¼ inch (0.6 cm) thick.
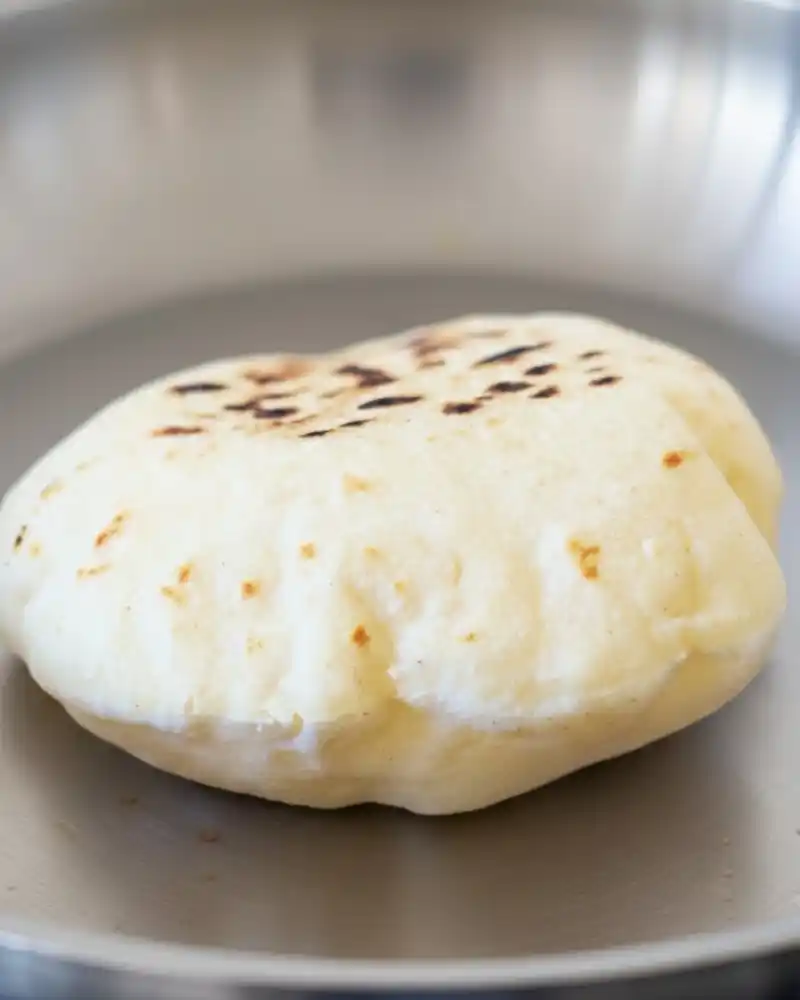
Cook the Pitas
Preheat a skillet over medium-high heat for several minutes (about 200°C / 390°F).
Place one pita in the hot pan and cook for roughly 1 minute until bubbles begin to appear.
Flip and cook for another few minutes on the second side.
Turn once more, and the pita should inflate, forming a pocket.
Repeat with the remaining dough, keeping cooked pitas wrapped in a clean kitchen towel to stay warm.
Serve
Enjoy warm with falafel and a drizzle of tahini sauce.
Make Ahead & Storage Tips
This gluten-free dough can be prepared ahead of time and cooked as needed. Simply cover the uncooked dough and store it in the refrigerator for up to 2–3 days.
Storing Cooked Pitas:
While gluten-free pita bread is best enjoyed fresh to maintain its soft texture, leftovers can still be saved. Place them in an airtight container to prevent drying and store for a few days. To reheat, lightly sprinkle with water and microwave for 10–15 seconds, or warm them in the oven for a couple of minutes until soft and pliable again.
Looking for more gluten-free recipes? Be sure to check these recipes out:
- Gluten Free Naan Bread Recipe
- Gluten Free Cinnamon Pull-Apart Bread
- Gluten-Free Focaccia Bread
- Gluten-Free Star Bread
You can also FOLLOW ME on Facebook and Pinterest to see more of the delicious food I’m making!
Gluten-Free Pita Bread

Gluten-Free Pita Bread that puffs into soft pockets on the stovetop, made with rice flour, tapioca & psyllium. Easy to freeze, reheat, and stuff with your favorite fillings
Ingredients
- 1 ½ cup + 2 tbsp (400 ml) warm water
- 20 g fresh yeast (see notes)
- 3 tsp organic cane sugar
- 2 cups (320 g) white rice flour (see notes for a version with regular flour)
- 1 ⅓ cup (160 g) tapioca flour
- 4 tsp psyllium husk powder
- 1 tsp salt
- 4 tsp oil
Instructions
Prepare the Yeast
- For best accuracy, I suggest weighing your ingredients in grams using a kitchen scale rather than measuring by volume.
- Warm the water gently in a small saucepan over medium heat until it’s just lukewarm, not hot, around 40°C (104°F).
- Stir in the yeast and sugar, then set the mixture aside for about 5 minutes. When a light foam appears on the surface, the yeast is activated and ready to use.
Mix the Dough
- In a large bowl, whisk together the rice flour, tapioca flour, psyllium husk powder, and salt until evenly combined.
- Pour in the yeast mixture along with the oil, and mix using a wooden spoon until a soft dough forms.
Knead and Rise
- Work the dough with your hands for a few minutes until smooth, then shape it into a ball and return it to the bowl.
- Cover tightly with cling film and place in a warm spot (ideally 40–50°C / 104–120°F). Let it rise for 45–60 minutes, or until visibly puffy.
Shape the Pitas
- Divide the dough into 10 equal portions, about 90 grams each, and roll them into balls.
- Cover and allow them to rest for 10–15 minutes.
- Using a lightly floured rolling pin, roll each ball into a round approximately ¼ inch (0.6 cm) thick.
Cook the Pitas
- Preheat a skillet over medium-high heat for several minutes (about 200°C / 390°F).
- Place one pita in the hot pan and cook for roughly 1 minute until bubbles begin to appear.
- Flip and cook for another few minutes on the second side.
- Turn once more, and the pita should inflate, forming a pocket.
- Repeat with the remaining dough, keeping cooked pitas wrapped in a clean kitchen towel to stay warm.
Serve
- Enjoy warm with falafel and a drizzle of tahini sauce.
Recommended Products
As an Amazon Associate and member of other affiliate programs, I earn from qualifying purchases.
-
 Bob's Red Mill Gluten Free White Rice Flour, 24 Oz (4 Pack)
 -
Anthony's Organic Tapioca Flour Starch, 2.5 lb, Gluten Free, Non GMO
-
Viva Naturals Organic Psyllium Husk Powder, 24 oz – Finely Ground, Unflavored, Vegan, Keto, Paleo, Non-GMO Plant-Based Superfood, Good Source of Fiber for Gluten-Free Baking, Juices & Smoothies
-
Celtic Sea Salt, Fine Ground Mineral Sea Salt, 1 lb Resealable Bag, Unrefined Hydration, Vital Minerals, Family Founded Since 1976
-
Island Fresh Organic Coconut Oil, Extra Virgin, Cold-Pressed, 54 fl oz – USDA Organic, Non-GMO for Cooking, Baking, Hair and Skin


Nutrition Information:
Yield:
10Serving Size:
1Amount Per Serving: Calories: 194Total Fat: 3gSaturated Fat: 0gUnsaturated Fat: 3gSodium: 220mgCarbohydrates: 44gFiber: 3gSugar: 2gProtein: 4g


