
Love sourdough but gluten-free? Our recipe unlocks the secrets to delicious Gluten-Free Sourdough Bread you can bake at home!
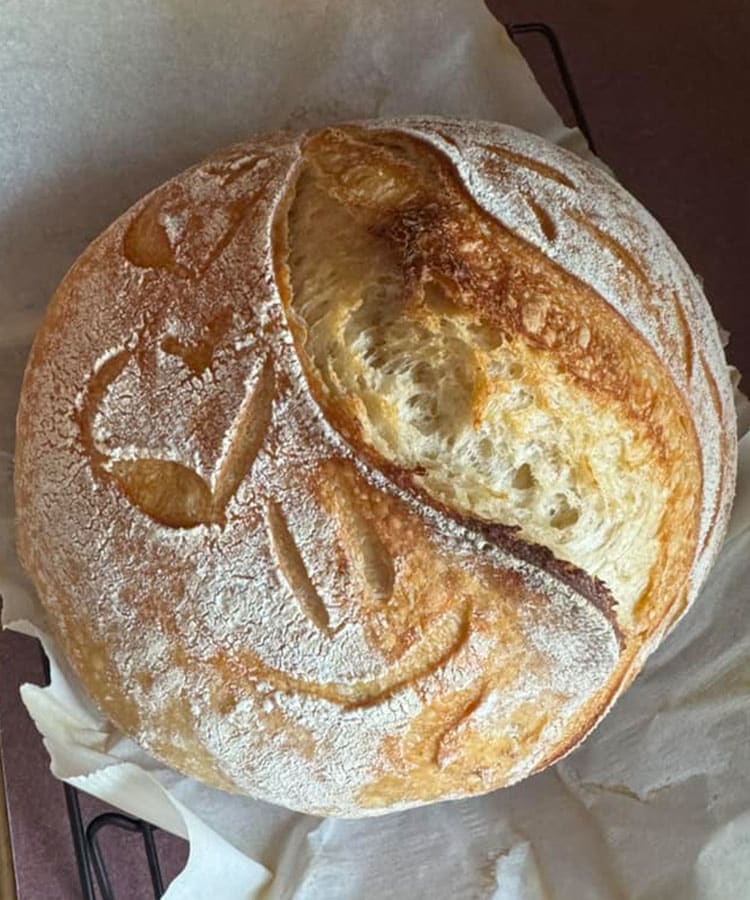
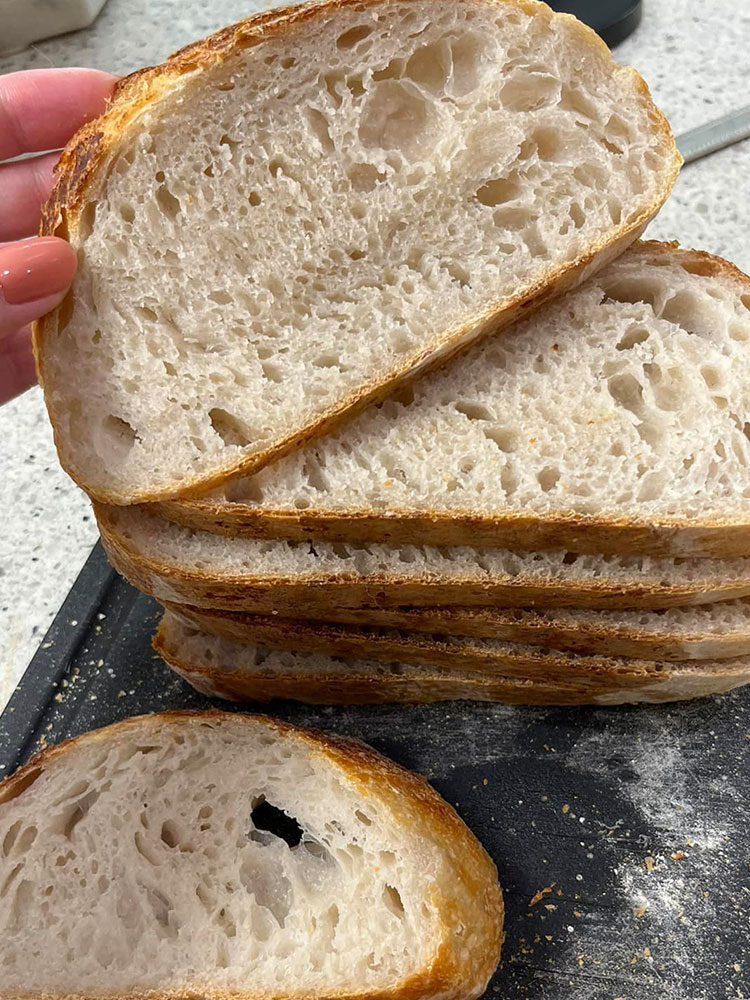
Craving sourdough’s tangy taste but missing it since going gluten-free? We’ve got you covered! This recipe unlocks the secrets to baking amazing gluten-free sourdough bread that boasts a delightful sour flavor and airy texture. Made with readily available ingredients and a clear step-by-step guide, this recipe is perfect for both gluten-free sourdough beginners and experienced bakers. Now you can enjoy classic sourdough without sacrificing taste or following a complicated process.
HOW DO I MAKE MY GLUTEN-FREE SOURDOUGH BREAD: STEP-BY-STEP INSTRUCTIONS
1. Feed the Starter: When ready to feed your starter, remove it from the fridge and feed it with 30-50g of a whole grain flour of choice and 30-50g of water. Stir and cover tightly.
2. Leave it on the counter until it nearly doubles in size.
3. Making the Dough: Add water, olive oil, honey, GF bread flour blend, psyllium husks, baking powder (if using), salt, and active starter in the bowl of a stand mixer.
4. Knead using the dough hook for 5 minutes on medium-high.
5. Alternatively, the dough can be mixed in a large bowl using a Danish dough whisk or similar, but you must mix very vigorously to get the proper texture.
6. Cover the dough and allow it to rise in a warm until puffed for about 3-4 hours (sourdough always takes longer to rise).
7. Then place the puffed dough in the refrigerator overnight.
8. The next day, remove the dough from the fridge and turn it out onto a surface well-floured with an extra gf bread flour blend. If using baking soda, add ¼-½ teaspoon to the top of the dough and begin kneading dough until smooth.
9. Then form into a round and turn over into a floured banneton basket.
10. Cover and allow it to rise until dough reaches the top of the banneton from 2-6 hours.
11. Towards the end of the rising time, place a Dutch oven with a lid into the oven and preheat it to 500° F for 30 minutes.
12. When the dough has finished rising, flip it out onto a sheet of parchment paper and slash (score) it with a lame.
13. Then carefully place the loaf in the Dutch oven, parchment and all, and replace the lid.
14. Alternatively, slide the loaf, parchment, and all, onto a baking sheet or stone and pour one cup of hot water into a shallow pan.
15. Immediately close the oven door and drop the temperature to 450° F.
16. Bake the bread for 40 minutes. If using a Dutch oven, remove the cover and continue to bake for another 20 minutes.
17. If using baking steel or stone, bake the bread for the full 60 minutes.
18. Allow the bread to cool before slicing after removing it from the oven.
INGREDIENTS NEEDED:
- 390 grams of flour (I use Kim’s gluten-free bread flour blend)
- 60 grams active gluten-free sourdough starter
- 1½ teaspoon psyllium husk powder
- 2 tsp kosher salt
- 2 tsp heat-activated baking powder (optional)
- 390 ml water
- 26 grams of olive oil
- 21 grams honey
TIPS:
Use a blend of flours to balance texture and flavor.
Incorporate binders like psyllium husk or xanthan gum.
Allow ample rising time and use a warm, draft-free environment.
Best practices for storage
Store gluten-free sourdough bread in a paper bag or bread box to maintain its crust. For longer storage, use an airtight container.
How to freeze sourdough bread
Slice your bread and place it in a freezer-safe bag. Thaw slices at room temperature or toast them directly from the freezer.
FAQs:
Can I use store-bought gluten-free flour blends?
Yes, but ensure the blend includes a mix of flours and starches for the best results.
Why is my dough so sticky?
Gluten-free doughs tend to be sticky. Wet your hands or use a dough scraper to handle it more easily.
How long does the starter last?
With regular feeding, a sourdough starter can last indefinitely.
Can I bake sourdough in a bread machine?
It’s possible, but traditional oven baking often yields better texture and crust.
Why didn’t my bread rise?
Ensure your starter is active and bubbly. Temperature and humidity can also affect rising times.
Gluten-Free Sourdough Bread

Love sourdough but gluten-free? Our recipe unlocks the secrets to delicious Gluten-Free Sourdough Bread you can bake at home!
Ingredients
- 390 grams of flour (I use Kim's gluten-free bread flour blend)
- 60 grams active gluten-free sourdough starter
- 1½ teaspoon psyllium husk powder
- 2 tsp kosher salt
- 2 tsp heat-activated baking powder (optional)
- 390 ml water
- 26 grams of olive oil
- 21 grams honey
Instructions
- Feed the Starter: When ready to feed your starter, remove it from the fridge and feed it with 30-50g of a whole grain flour of choice and 30-50g of water. Stir and cover tightly.
- Leave it on the counter until it nearly doubles in size.
- Making the Dough: Add water, olive oil, honey, GF bread flour blend, psyllium husks, baking powder (if using), salt, and active starter in the bowl of a stand mixer.
- Knead using the dough hook for 5 minutes on medium-high.
- Alternatively, the dough can be mixed in a large bowl using a Danish dough whisk or similar, but you must mix very vigorously to get the proper texture.
- Cover the dough and allow it to rise in a warm until puffed for about 3-4 hours (sourdough always takes longer to rise).
- Then place the puffed dough in the refrigerator overnight.
- The next day, remove the dough from the fridge and turn it out onto a surface well-floured with an extra gf bread flour blend. If using baking soda, add ¼-½ teaspoon to the top of the dough and begin kneading dough until smooth.
- Then form into a round and turn over into a floured banneton basket.
- Cover and allow it to rise until dough reaches the top of the banneton from 2-6 hours.
- Towards the end of the rising time, place a Dutch oven with a lid into the oven and preheat it to 500° F for 30 minutes.
- When the dough has finished rising, flip it out onto a sheet of parchment paper and slash (score) it with a lame.
- Then carefully place the loaf in the Dutch oven, parchment and all, and replace the lid.
- Alternatively, slide the loaf, parchment, and all, onto a baking sheet or stone and pour one cup of hot water into a shallow pan.
- Immediately close the oven door and drop the temperature to 450° F.
- Bake the bread for 40 minutes. If using a Dutch oven, remove the cover and continue to bake for another 20 minutes.
- If using baking steel or stone, bake the bread for the full 60 minutes.
- Allow the bread to cool before slicing after removing it from the oven.
Notes
The recipe makes 1 loaf
Recommended Products
As an Amazon Associate and member of other affiliate programs, I earn from qualifying purchases.