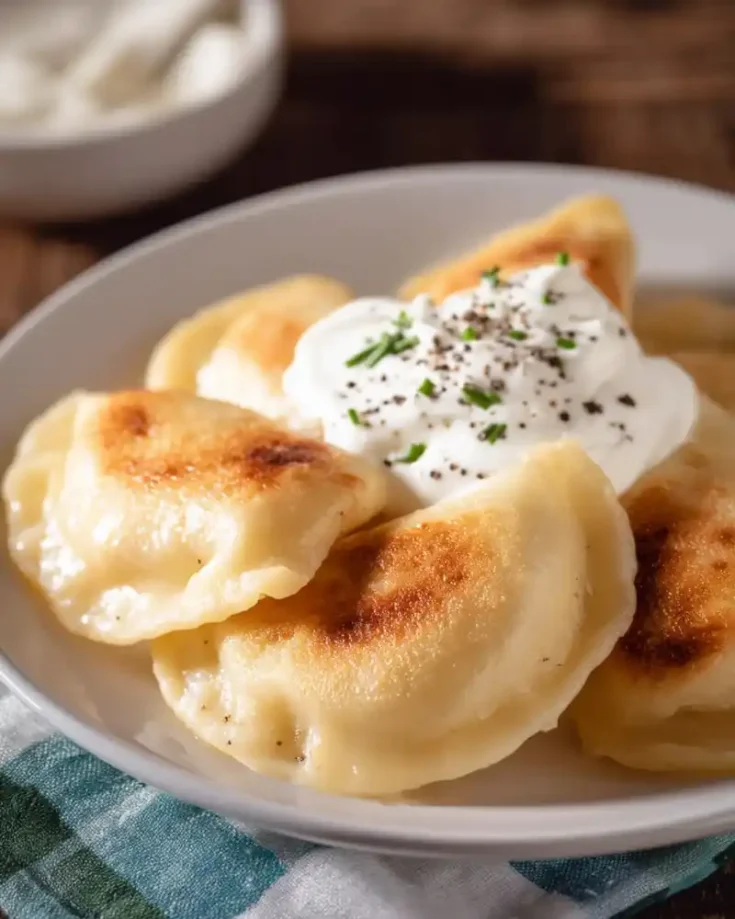
There’s nothing quite like a warm, homemade Gluten-Free Perogies, soft dough filled with creamy potatoes, cheese, or sauerkraut, but for anyone avoiding gluten, this comforting dish can seem off-limits. Luckily, with a few smart substitutions and the right blend of gluten-free flours, you can make gluten-free perogies that taste just as good as traditional ones.

This recipe uses a blend of rice, tapioca, and potato starches to create a soft, elastic dough that’s easy to roll and seals beautifully. Whether you’re Polish by heritage or love cozy comfort food, this gluten-free version lets you enjoy perogies without compromise.
Ingredients in Gluten-Free Perogies
For the dough:
- Cream-style cottage cheese
- Milk
- Egg
- Oil
- Brown rice flour
- Cornstarch
- Tapioca starch
- Potato starch
- Sweet rice flour
- Xanthan gum
- Salt
- Extra brown rice flour for dusting
For the filling:
Use your favorite pierogi filling, mashed potatoes with cheddar cheese, sauerkraut, sautéed onions, mushrooms, or even sweet fillings like blueberries or farmer’s cheese.
Tips for Perfect Gluten-Free Perogies
- Don’t skip the xanthan gum: It gives the dough elasticity and structure, helping it stay together while rolling and boiling.
- Roll between plastic wrap: Gluten-free dough is delicate, and this method prevents tearing and sticking.
- Work with small portions: Rolling one perogy at a time prevents the dough from drying out.
- Seal carefully: Wetting the edges helps keep fillings from leaking during cooking.
- Boil gently: Avoid crowding the pot so the water stays hot and the perogies cook evenly.
- Double-cook for best flavor: Boil first, then pan-fry for a crisp, buttery edge.

How to Make Gluten-Free Perogies. Step-by-Step Instructions:
Step 1: Prepare the dough
Add the cottage cheese, milk, egg, and oil to a blender and mix until completely smooth. In a stand mixer, combine all dry ingredients (flours, starches, xanthan gum, and salt). Slowly add the wet mixture while the mixer runs on low speed until the dough forms; it should be soft but not sticky.
Step 2: Shape the dough
Shape a portion of dough, roughly the size of a golf ball, into a smooth ball. Place it between two sheets of plastic wrap and roll it out into an oval, about 1/16 inch thick. Remove the top layer of plastic wrap.
Step 3: Fill and seal
Spoon your chosen filling onto one half of the oval. Wet the edge of the dough with water to help it seal. Use the plastic wrap to fold the dough over, forming a half-moon shape. Gently press the edges to seal, starting near the filling to push out any air. Use a bowl or cutter to trim the edge neatly.
Step 4: Chill or freeze
Place the perogies on a cloth-lined baking sheet, cover with plastic wrap, and refrigerate. You can also freeze them for later, simply freeze until solid and store in airtight bags.
Step 5: Cook
Heat a large pot of water that has been salted to a boil. Add a few pierogies to the pot at a time. Stir gently to keep them from sticking. After they float, cook for an additional minute and then remove with a slotted spoon. Place them on a greased, parchment-lined baking sheet so they don’t stick. Drizzle with melted butter or a touch of oil.
For a golden, crispy finish, fry them lightly in butter after boiling; this gives the perogies a delicious texture and rich flavor.

FAQs for Gluten-Free Perogies
Are Mrs. T’s pierogies gluten free?
No, Mrs. T’s Pierogies are not gluten-free. They’re made with traditional wheat flour dough. However, you can easily make your own at home using this gluten-free perogy recipe or find specialty gluten-free options in select health food stores.
Can you get gluten-free pierogi?
Yes! You can find gluten-free pierogies at some grocery stores or farmers markets, but homemade ones always taste fresher. Making them from scratch also lets you control ingredients, perfect for those with celiac disease or gluten sensitivity.
Are Polish pierogies gluten free?
Traditional Polish pierogies are not gluten-free since they use wheat flour. But by swapping in gluten-free flours and starches, you can create a version that’s true to the authentic taste and texture of the Polish original.
What is pierogi dough made of?
Classic pierogi dough typically includes wheat flour, eggs, water, and salt. This gluten-free version uses a blend of brown rice flour, tapioca starch, potato starch, and sweet rice flour to mimic the elasticity of wheat, without the gluten.
Looking for more gluten-free recipes!
- Gluten Free Pizza Crust Recipe
- Gluten-Free Cheeseburger Pasta Recipe
- Gluten-Free Chicken Noodle Soup
- Gluten-Free Chicken Fritters Recipe
- Gluten-Free Chicken Parmesan Recipe
- Gluten-Free Chicken Cordon Bleu Recipe
- Gluten-Free Chicken Quesadillas Recipe
You can also FOLLOW ME on Facebook and Pinterest to see more of the delicious food I’m making!
Gluten-Free Perogies
Make delicious gluten-free perogies at home! Soft dough, rich fillings, and all the flavor of traditional pierogies, without a bit of gluten.
Ingredients
For the dough:
- 1/2 cup cream-style cottage cheese (or 1/3 cup sour cream)
- 1/4 cup milk
- 1 large egg
- 1 tablespoon oil
- 1/2 cup brown rice flour
- 1/4 cup cornstarch
- 1/4 cup tapioca starch
- 2 tablespoons potato starch
- 2 tablespoons sweet rice flour
- 1 teaspoon xanthan gum
- 1/2 teaspoon salt
- Extra brown rice flour for dusting
For the filling:
- Use your favorite pierogi filling, mashed potatoes with cheddar cheese, sauerkraut, sautéed onions, mushrooms, or even sweet fillings like blueberries or farmer’s cheese.
Instructions
- Add the cottage cheese, milk, egg, and oil to a blender and mix until completely smooth.
- In a stand mixer, combine all dry ingredients (flours, starches, xanthan gum, and salt).
- Slowly add the wet mixture while the mixer runs on low speed until the dough forms; it should be soft but not sticky.
- Shape a portion of dough, roughly the size of a golf ball, into a smooth ball. Place it between two sheets of plastic wrap and roll it out into an oval, about 1/16 inch thick.
- Remove the top layer of plastic wrap.
- Spoon your chosen filling onto one half of the oval.
- Wet the edge of the dough with water to help it seal.
- Use the plastic wrap to fold the dough over, forming a half-moon shape.
- Gently press the edges to seal, starting near the filling to push out any air.
- Use a bowl or cutter to trim the edge neatly.
- Place the perogies on a cloth-lined baking sheet, cover with plastic wrap, and refrigerate. You can also freeze them for later, simply freeze until solid and store in airtight bags.
- Heat a large pot of water that has been salted to a boil.
- Add a few pierogies to the pot at a time. Stir gently to keep them from sticking. After they float, cook for an additional minute and then remove with a slotted spoon.
- Place them on a greased, parchment-lined baking sheet so they don’t stick.
- Drizzle with melted butter or a touch of oil.
- For a golden, crispy finish, fry them lightly in butter after boiling; this gives the perogies a delicious texture and rich flavor.
Notes
- Place the dough on a sheet of plastic wrap, and fold the plastic wrap over the dough. This makes it easy to roll the dough thin without it sticking or tearing. You also won’t need to dust it with a lot of extra flour, which helps keep your perogies soft and tender.
- Wet the edges of the dough before closing your perogies, and shape your pinky fingers around the filling to gently push out any trapped air. This small step helps prevent your perogies from bursting open while boiling.
- Use the plastic wrap to lift the dough over the filling; it’s an easy way to fold and seal without stretching or breaking the dough.
- For a clean, uniform look, use a cup or small bowl with a thin edge to cut each perogy. This gives them a neat, rounded shape that cooks evenly and looks beautiful on the plate.
- If you have leftover dough scraps, gather and knead them gently, then roll again to make a few extra perogies, no waste, and they’ll taste just as good as the first batch!
Don’t forget to PIN IT for later!

This recipe was inspired by Faithfully Gluten Free


What could I substitute for brown rice flour, which makes me very ill.
You can substitute brown rice flour with white rice flour (best 1:1 swap).
Other good options: sorghum flour or gluten-free oat flour.
For better texture, mix with a starch like tapioca or potato starch.
Pierogi not pierogies .
Thank you
Also thank you for this recipe .
Can these be made with egg replacer instead of the actual egg due to allergies?
Also can the sour cream be dairy free due to allergies?
Can you use all arrowroot starch for corn starch and tapioca starch due to allergies?